Commands (CLI)
Edit this page# Installing
npm i -g @firelayer/cli
# Commands
# for help on the commands
firelayer -h
# add
Add templates to the current firelayer project
# add from firelayer repository: https://github.com/firelayer/{name}-template
firelayer add:template starter

# or add directly from a git repository
firelayer add:template git@github.com:firelayer/starter-template.git
# auth
Users and authentication commands
# create a new user
firelayer auth:add -u useremail@example.com -p password123

# get the user information
firelayer auth -u useremail@example.com

# set the user as admin ( custom claims with admin: 1 )
firelayer auth -u useremail@example.com --set-admin
# db
Firestore and realtime database helpers
# populate the databases with the seed files on `database/seeds`
firelayer db:seed
# deploy
Deploy helpers
# deploy the Firebase Cloud Functions environment variables
# content from: `config/app.{env}.json` + `config/functions/env.{env}.json`
firelayer deploy:env

# deploy storage CORS configurations `rules/storage-cors.json`
firelayer deploy:cors
# env
Set working environment. It will use the respective .firebaserc aliases and config files.
Affects which configs are injected using firelayer run "node index.js"
Example for firelayer env default will use the config files:
- config/app.json, config/functions/env.json, etc
.firebasercalias 'default'- config/keys/key.json
Example for firelayer env production will use the config files:
- config/app.production.json, config/functions/env.production.json, etc
.firebasercalias 'production'- config/keys/key.production.json
# display current environment
firelayer env

# change environment to 'default'
firelayer env default
# init
Create a new project
firelayer init projectname

# select template to initialize project
firelayer init projectname -t starter
# make
Maker helpers
# make a new migration `database/migrations/{migration}`
firelayer make:migration

# firestore model maker
firelayer make:model
# migrate
Database migrations
# run `database/migrations` migrations
firelayer migrate

# rollback last migration or x migrations with --steps x flag
firelayer migrate:rollback
# run
Run shell commands with injected process.env config variables
firelayer run "node index.js"
# up / down
Maintenance mode for the application.
- Will deploy rules that will prevent read and write access for Storage, Firestore and Realtime database.
- Set the Realtime '_settings': { maintenance: true } so the frontend can see the maintenance mode.
# put the application into maintenance mode
firelayer down

# bring the application out of maintenance mode
firelayer up
# info
Print debugging information about your environment
firelayer info
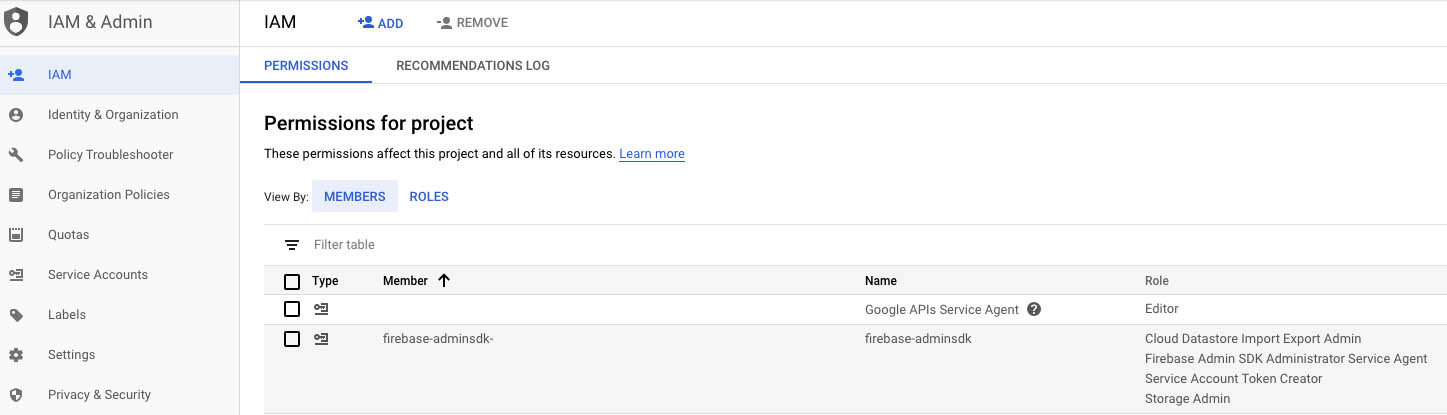
# Permissions requirements
For all the commands to work your service account needs to have the Google Cloud IAM permissions:
- Cloud Datastore Import Export Admin (for backups)
- Storage Admin (for backups)
After following the steps on how to get a service account key, go to your google cloud console and follow the steps:
- open google cloud console IAM
- make sure you are editing the correct project in the upper left corner
- find the member with the name
firebase-adminsdkand click theeditpencil button - click
ADD ANOTHER ROLEand add:
-- Cloud Datastore Import Export Admin
-- Storage Admin - click SAVE and that's it
In the end your IAM would look something like this: